
When I first built my raised garden beds I only used a shovel to dig the beds and a saw to cut the cedar planks. Now that I think of it, the first season I just used a shovel because the raised beds had no sides – I added the cedar sides the following year. This is about my trial and error to arrive at the best way to build my raised garden beds.
Raised garden beds are the best way to grow fruits and vegetables
Raised garden beds are by far the best way to grow vegetables and shrub or cane and shrub fruits. They allow for deeper root growth, better drought resistance, better water management, and consequently fewer pest and disease problems. Once the raised bed is established, weeding is a breeze, watering is more efficient, and you can take much more pleasure in your gardening. I can honestly say that raised garden beds changed my gardening life – my back hurts less, I spend less time watering and weeding, and I grow more fruits and vegetables in the same space.
“In a typical narrow row garden, over half the soil is compacted into walkways for the gardener…In a garden with wide, deep, raised beds…plants get the lion’s share of the space and they get the lion’s share of the soil.”The Vegetable Gardener's Bible by Ed Smith
You should know that I’m not a handy guy at all. I know my way around plants and soil, but when it comes to cutting lumber, driving screws, and applying finish, I’m hopeless. It always looks so easy in the DIY YouTube video, but my end result is like something out of a summer camp for pre-teens wood shop. So if I actually summon the willpower to try and build something, I want to do it with a minimum of tools. This saves me a lot of grief and the neighbors and kids hear less profanity.
That’s why, when I started building my raised beds, I only used a shovel the first season, and built open beds. In the second season I bought cedar planks and cut them to size with a rotary saw and used a hammer to drive rebar supports on the sides of the planks. Eventually, I also needed screws, a screwdriver, and L-brackets to fasten them together. But that came much later.
I know you handy folks out there will laugh at some of this, but whatever…
My first try was a raised garden bed without sides
I started my raised garden beds by double digging a south-facing section of my backyard (south-facing is the ideal direction for a garden bed so that it receives the maximum amount of sunlight). Then I mixed the mounds of soil with homemade compost. Since I did this I’ve learned that double-digging is not necessary – and in fact, soil scientists advise against it. You only have to create the beds with your native soil or purchased topsoil and add compost on top of it and around your plants each season.
I initially built the garden beds without wooden sides – just open, raised beds (when I first embarked on this adventure you couldn’t find plans online – I had only read about them). The first year the crop yields were excellent, but water runoff was high, as the soil in the raised beds naturally settled, rolled off, and created sloped sides. I also realized that if I installed sides, I would have more surface area to plant and the wood would keep the weeds from creeping into the raised beds.
What I learned: Build the raised beds with sides, either of cedar (a natural resistance to pests) or a material of your choosing (but avoid any materials that may leach chemicals into your garden soil). Straw bales are especially effective but need to be replaced each year. Double digging is not necessary.Adding sides to the raised bed made water and soil management more efficient

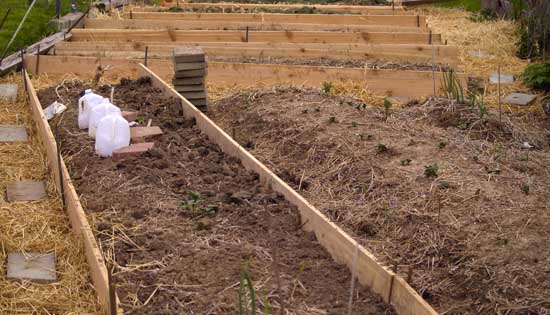
In early spring the 2nd year I ordered planks of #3 Cedar from a local building supplier and cut each to the size needed (cedar has excellent rot resistance). I didn’t join them together in any permanent fashion, as I wanted the flexibility to shorten, lengthen or widen my raised garden beds as I saw fit.
I initially supported the 12′ cedar sides with 18″ rebar on the outside every few feet to prevent warping. The short end boards were kept in place with pavers laid horizontally. Adding the cedar sides really improved things. With the sides on, water retention was higher, requiring less watering; I could plant to the very edges; the soil stayed in the garden bed; the straw mulch stayed in the path, and weeds no longer crept into the garden bed from the path.
In the spring of the 3rd season, I fastened all of the cedar planks together with L-brackets on the inside and outside corners to fix the sides together and prevent warping. I’m happy to say the beds are still standing more than 10 years later, although some of the cedar may have to be replaced soon – persistent moisture eventually rots anything.
What I learned: I should have fastened the cedar planks together the first year and before soil was added, but I was kind of making it up as I went.How to build a raised garden bed in 6 steps
1. Choose the sunniest part of your yard for your raised garden bed.

Check the track of spring and summer sunlight in your soon-to-be garden space and look for shadow-casting obstacles. Is there a wall near your future garden? Trees? Shrubs? Plan for as much sun exposure as possible. The best orientation for your raised garden bed is south-facing so they’ll receive the maximum amount of sunlight each day. Your garden beds don’t have to be perfectly straight or exactly the same width from tip to tip – use your imagination to take advantage of what space you have.
2. Determine a comfortable length and width for each bed.
Your raised garden bed can be as long as you want it to be, but the width should be gauged according to your arm’s reach: If you can comfortably reach 18″, the garden bed should be no more than 36″ wide, so you can easily weed, plant and harvest from either side. This will also save a lot of stress on your knees and back. Once you determine the width and length, order untreated cedar or locust lumber from your local lumber yard. Number 3 cedar and locust have the greatest rot resistance and will last many years. Many lumber yards or home centers will pre-saw the planks for you so they’ll arrive ready for assembly.
3. Mark off the area.

Once you’ve decided on the width and length, use a measuring tape, stakes, twine, rope, clothesline, or string to mark off the area for your garden beds. Place a stake at each corner and on each long side, and run the rope or twine between each stake. Allow at least 18″ between each bed for your walkways. I’m 6’4″, so for me, 24″ is the most comfortable width, as it allows plenty of space for me to bend, stretch, turn around, and haul tools.
4. Layout and dig the raised garden beds and walkways.
**If you don’t wish or need to dig, you can skip this step, as long as you have sufficient soil from elsewhere to fill the raised bed. The height of the raised bed should be sufficient to accommodate any vegetable root or tuber.
Using the stakes and line, outline the beds, then dig (or till) to 10″-18″ so your plants’ roots have plenty of room to spread. Loosen and turn the soil with a garden fork, then follow with a spade shovel, making sure that all turf is turned upside down and broken up. Place your planks under the lines after digging. Note: I only ever recommend tilling in a case like this when you’re establishing a new bed – usually, tilling is a bad idea.
Next, dig your walkway 18″-24″ wide and at least 10″ deep and place this soil in the raised garden bed. Rake the soil in. Or if you’re simply laying your raised beds on the surface, make sure they’re a comfortable distance apart.
5. Create walkways

Your local climate, rainfall, and personal preference can determine what you use in the walkways. Some gardeners use pea gravel, some use mulch, and some plant grass, which can host beneficial insects. I encourage you to experiment and find what’s best for you. I’ve used all of these and currently have grass planted between the beds, which I love because kneeling is much more comfortable and there’s no need to rehab it between seasons. I also like to see as much green as possible.
6. Add organic material and soil

After your raised beds are built, add lots of compost, shredded tree leaves, grass clippings, or composted manure to build the soil, working it in with your rake (composted manure should never be used solo, but it’s great when mixed with other composts). The best time of the year to build your raised garden bed is in the Fall so the compost can work its magic until it’s time to plant in spring.

